
SSH is the indispensable service for the Linux servers, which is a method of secure login from one server to a remote server. It is also used to transfer files over the network using secure copy (SCP) Protocol.
In Hadoop clusters, SSH is commonly used to do connect to all nodes from the SCM server.
Using password less SSH key authentication method, we can automate login to remote computers without a need to manually enter the user account’s password everytime.
Let’s see the steps involved in setting up password less ssh connection.
- To setup password less ssh, we need a ssh keypair, a pair of public and private key.
- After keypair generation, we’ll copy the public key in source to the user account in the destination.
- Then we can connect to the destination from source using the private key of the key pair.
- The SSH service will verify the private key in the source to the copied pub key in the destination.
- If both key matches, the connection will be established.
————————-
If you’re confused about this, consider the following analogy.
1) Assume you’re in a hotel. You have a key and the lock pair. (key – private key, lock – public key)
2) You give away your lock to one of the rooms in the hotel. (copying public key)
3) Now only you can unlock the lock using the key in your hand (using private key connecting to the remote machine).
4) If your key fits the lock, access will be granted. (if private key matches pub key)
——————–
Now we have two servers named
ip-172-31-25-180 – Source
ip-172-31-25-147 – Destination
We’re going to setup passwordless ssh from 172.31.25.180 to 147 from the user account “hadoop”.
i.e from user account “hadoop” in 172.31.25.180, we’re going to ssh to hadoop user in 172.31.25.147
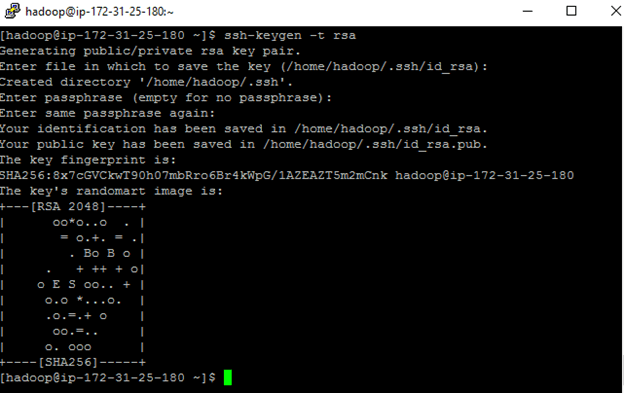
Step 1: Generate a ssh key pair in source machine.
The below command will generate a public/private rsa key pair in the server and both keys will be stored under .ssh folder in your home directory.
ssh-keygen –t rsa
The pub key has been saved as “id_rsa.pub” and private key saved as “id_rsa”.
Step 2: Copy the pub key to destination
Now the public key has to be copied to the desired user account in the destination machine.
The key has to added to a file named “authorized_keys” under /home/hadoop/.ssh/authorized_keys in 172.31.25.147
If the above path doesn’t exist, we have to create it manually.

After creating .ssh folder, we can update the public key in authorized_keys file in two ways.
One is to SCP the pub key from source to destination by providing credentials manually.
Or ‘cat’ the pub key in source, copy the contents and paste it in destination:/.ssh/authorized_keys.
I followed the second method since only password authentication is not allowed in AWS instances.

vi filename and paste.

Step 3: Connect from source using private key to destination
From source, run ssh username@destination. By default, ssh will pick the ‘id_rsa” private key file located in .ssh folder of user’s home directory.
If we moved or renamed the file, we can specify the file using “- i” option.
ssh –i .ssh/id_rsa hadoop

I got permission denied error for passwordless authentication when I tried to connect via ssh.
This could occur if the private key doesn’t match with public key or the key/file permissions are incorrect.
Since the keys are valid, let’s look at the permissions in both source and destination.
Source:

Destination:
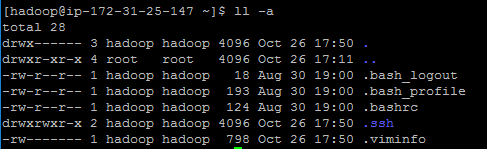
In destination, .ssh folder has 775(rwx-rwx-r-x) permissions, which should be 700 (rwx——).
Let’s change it to 700 and set 600(rw——-) for authorized_keys file inside .ssh folder.

After correcting the permissions, now we’re able to establish passwordless ssh connection successfully.

Remember, .ssh folder should always have 700 and authorized_keys should have 600 or lesser permissions for the ssh connection to work.
Now this passwordless setup is one way, i.e from 172.31.25.180 to 172.31.25.147.
If you try to connect from 172.31.25.147 to 180, it’ll fail. In order to set up, you have to follow the same steps now reversing the source and destination.
You can also use the existing keypair in the 172.31.25.180, i.e copy the private key to 172.31.25.147 and add the pub key to .ssh/authorized_keys.
It would definitely work, but it’s not recommended as it compromises the private key’s safety.
NOTE: Never share your private key to anyone.
If it’s shared, anyone can impersonate your user account and login to the servers in which you’ve passwordless ssh connection.
Thus, we have seen how to configure passwordless ssh connection between two nodes.
We can leverage this to automate taking backups, checking configurations, copying files to multiple nodes from a single machine using a “for loop” script. I’ll write a separate post on that.
I tried to keep this topic as detailed as possible yet simple. Post your queries, feedback on this in the comment section.
Kindly follow my blog to get notified of more useful posts, certification contents etc.,
Hi Kannan,
I use to do that way tell me your opinion about :
$ ssh-keygen
$ ssh-copy-id username@remoteserver
— type your password once and it will do the steps you list previously.
Great steps by steps article.
Regards
Donald F.
You’re right Donald.
ssh-copy-id will do the neat job of copying pub key and update permissions accordingly.
I couldn’t use it in example as Ec2 don’t allow password authentication by default. So had to do that way.
I’ll update the post and appreciate your valuable comments.